


")


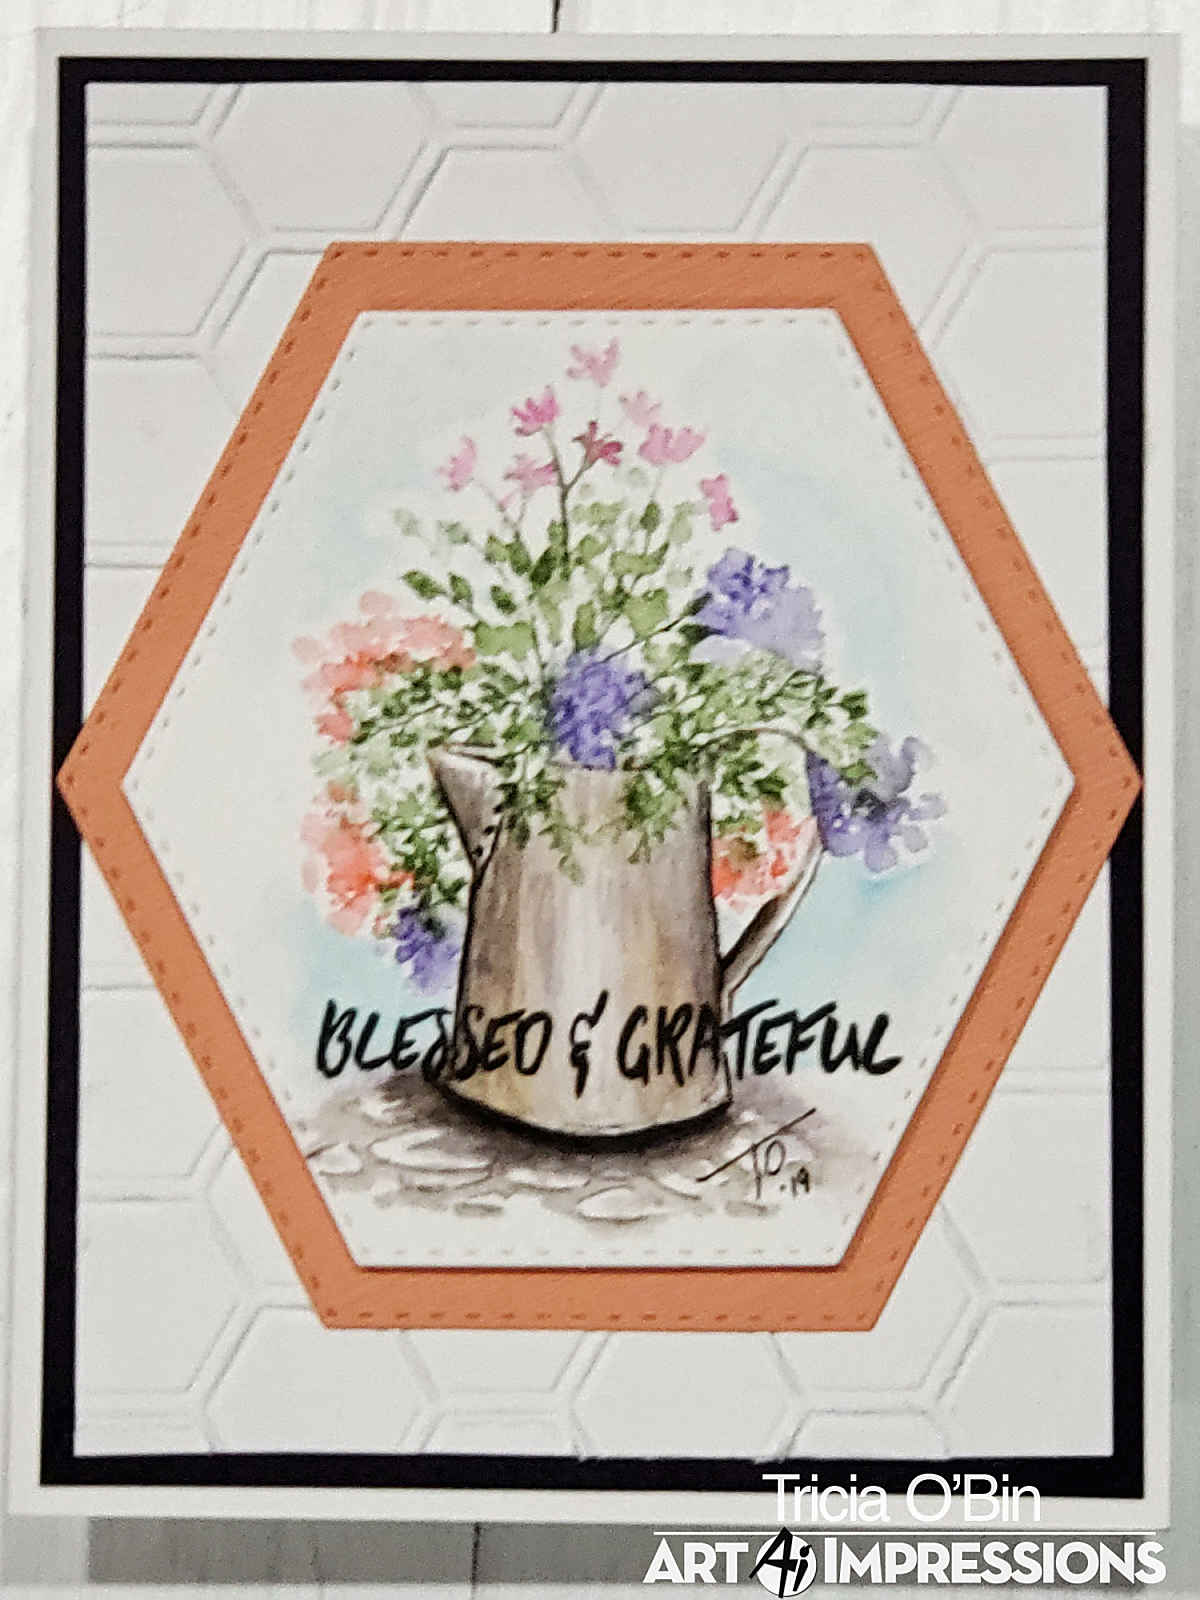
I am so excited to be a part of the Art Impressions watercolor stamp line New Release Part 1! They are rolling out half of their new watercolor stamp sets (Decorative Jars, Sentiments 2, Elves and Foliage 4). You are going to love ALL of these new sets. Today, I created a Blessed and Grateful flower arrangement card.
Make sure you head over to the Ai Blog to join in on the “Floral Cards” challenge!

Here is how I created my Blessed and Grateful card.
Step 1: Container
First, I inked up the container from the New Decorative Jar Set using 969-Chocolate and 569-Jet Blue. Pull the color out of the lines from the edges working your way in. In order to create the texture, add additional color in an up and down brush stroke, this creates the look of smooth metal. Make sure to leave your highlight in the middle of the container as well as along the top of the spout.

Step 2: Foliage
I inked up the leaves in the New Foliage 4 set with 177-Dark Jade. I stamped the leaves (5 times at least) along the top of the container. Make sure you leave enough space for the flowers. I added water to the foliage.

Step 3: Flowers
I inked the flower blooms from the Bible Flower set using 905-Red and stamped three blooms. I then inked up the small flower bunch from the Mini Flowers set with 606-Violet. I added 4 additional flower bunches. I added water to the blooms starting from the lightest area. I inked the stems from the Bible Flower set using 847-Crimson and 177-Dark Jade. I added water to the blooms. To fill in the middle of the bouquet, I added some additional foliage from the New Foliage 4 set.

Step 4: Cobblestones
I used a piece of post-it tape to mask the bottom half of the container. I inked up the cobblestones from the Cobblestones set with Chocolate and Jet Blue. I stamped it off and then stamped it under the container. When pulling the color out of the lines, make sure to pull it from below the stones to make them pop. I added some 476-cyan to sides of the container to show sky.

Step 5: The Card
Make sure you sign your work. I placed the watercolor piece in my MISTI stamping tool and inked up the “Blessed & Grateful” with Gina K Designs amalgam ink and stamped it along the bottom of the container.
Next, I cut the watercolor piece out with the new Hexagon double stitched die. I also cut a mat from peach card stock using one size larger Hexagon die. I popped up the watercolor piece using foam tape. I adhered this to a piece of white card stock cut to 3.75 x 5 that I ran through my big shot using a hexagon embossing folder.
I adhered this onto a Edible Eggplant card stock mat. I adhered this to a side folded card base.
Related: Art Impressions Challenge: Flowers and Foliage
SUPPLIES:


Tricia, I love your water coloring, and this card…….what I can see of it……
is another beauty. I am confused as to why you aren’t showing the
whole card, and not just bits and pieces of it. Will this be on You Tube?
Love your blog, I hope you’ll go back to showing ALL of your cards for us
to enjoy!
Hi Pat, I forgot to add the image…was going in to fix it when I saw your comment. thank you so much!!
Thx for your quick reply! Will this also be on YouTube?
Love your videos!
Pat
Very pretty, loving any new sets from AI I am addicted to the stamping with these stamps