Hi Watercolor Fans! Happy New Year! I am so excited to welcome you to the first watercolor weekend of 2019. We have so much inspiration for you! Join us over on the Art Impressions Blog for more inspiration the other talented designers!
I have outlined the steps I took to create the watercolor “Happy New Year” project as well as how I created the card itself. I would love for you to try it. Tag us on Instagram using #AIWatercolor and tag us so we can see what you come up with! Now onto the card…
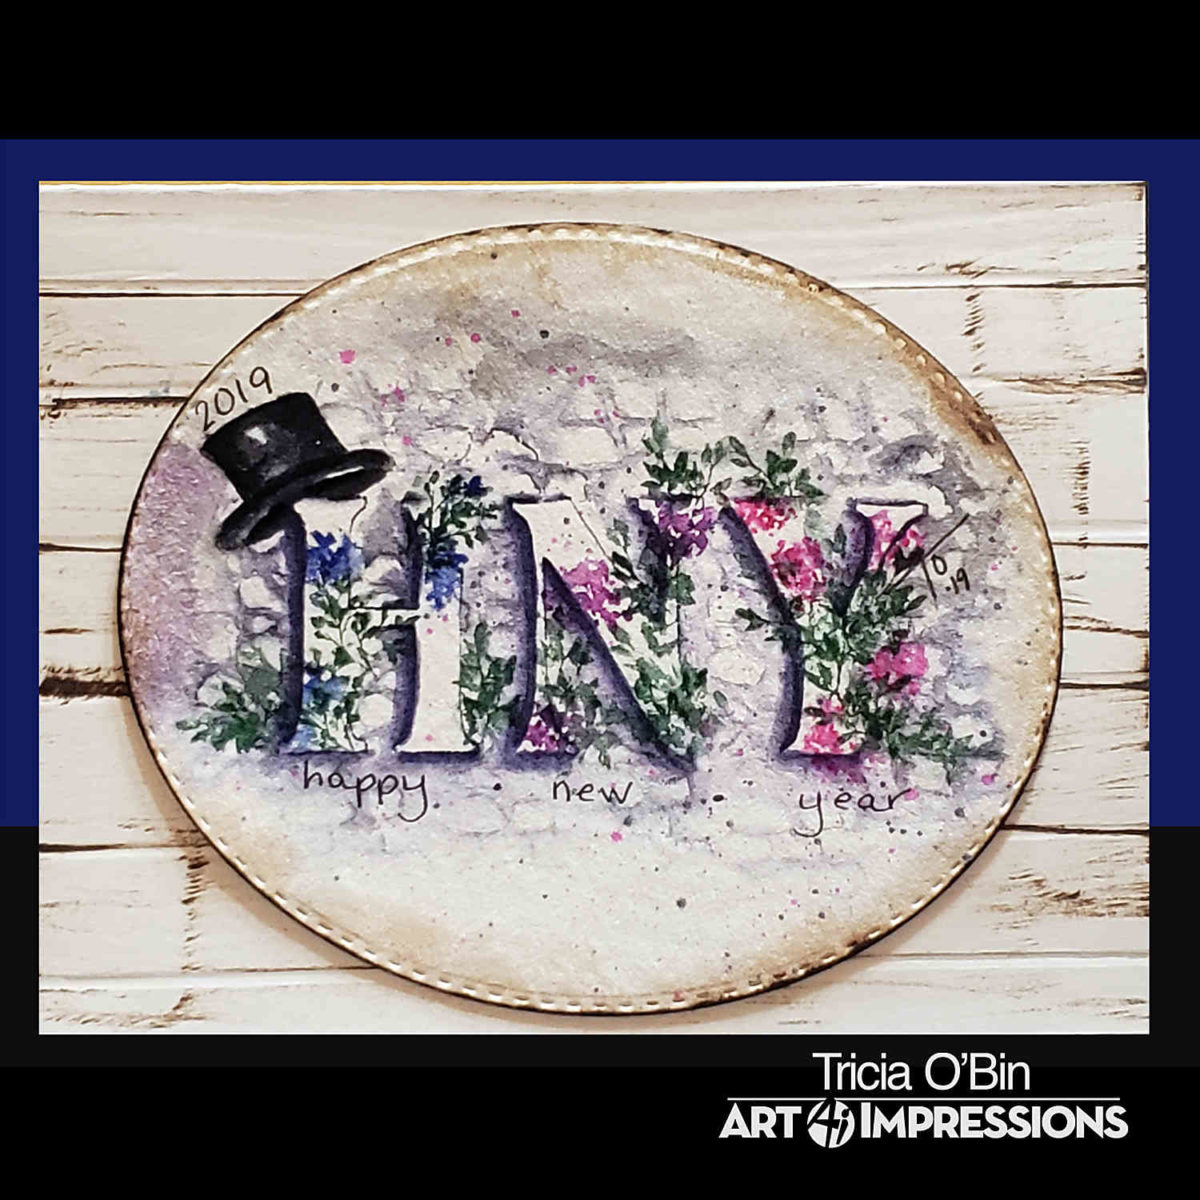
Step 1: I inked only the hat from the WC Snowman Set with Tombow N25. Using the stamp positioner, I placed the hat cocked to the left. I created a mask with the Post-It Adhesive Roll and covered the hat with the mask.
Step 2: I inked up each of the San Serif Letters (H, N, Y) using Tombow 569. I wiped off some of the ink. I stamped them next to each other. I created masks for each letter. Next, I inked up some of the stones from the WC Wall Texture Set using the Tombox N25 & 569 markers. I stamped it off and then stamped it to the left of the “H”. I repeated this process several more times stamping between the letters and to the right of the “Y”.
Step 3: Pull the color from the hat (on the sides working into the middle). I added some additional color from my palette. Next, pull the color from the left side of the letters only. Add water to the stones behind the letters.
Step 4: I inked up the small leaf cluster from the WC Foliage Set 3 with Tombow 249 and stamped it around the letter “H”. I then inked the vine and added it to the “N” & “Y”. Pull the color out of the lines.
Step 5: I added the small leaves from the WC Foliage Set 2 inked with Tombow 565 to the “H”. Next, I inked up the small dots from the WC Mini Flower Set with Tombow 676 and added flowers to the “N”. Add the inked the same flowers with Tombow 725 and added flowers to the “Y”. I added water to the flowers.
Step 6: Using my palette, I added some darker shadows to the letters. Using a fine black pen, I added the 2019 to the hat and Happy-New-Year below the letters. I added some color to my palette and flicked some color onto the background. I die cut the watercolor piece out with the Stitched Oval die. I added some Distress Ink in Espresso to the edges of the piece and added some water.
To create the card, I tried out a technique I saw on WPlus9’s YouTube channel, check it out here. Dawn is awesome and I love this technique. I will be doing more in the future. I used an A2 card scored at 4.25. I flipped the card over and scored the card at .75 inch intervals. I used Distress Ink (Espresso) to make the lines. I attached the oval to the background using Connect Glue from Gina K Designs.
Related: https://www.tobinartstudio.com/art-impressions-watercolor-release-bookmarks-and-tags/
Thank you so much for checking out the watercolor projects! I hope you had a wonderful holiday season and had a very Happy New Year!
Supplies:
Very pretty
Love it. Hope I can do something like it for other initials. Very pretty.
Happy New Year to you too.